Guides / Industries
Surgical Instrument Components on Swiss-Type Lathes: Pins, Shafts, Screws and Tips
October 23, 2026
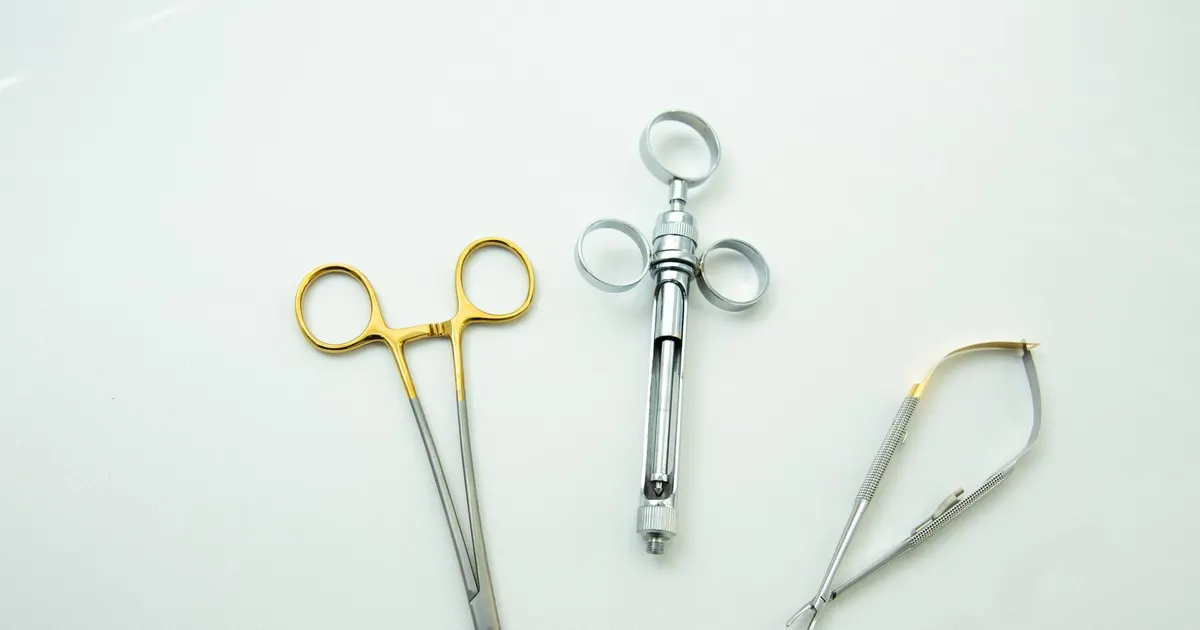
Surgical instruments are made of many small parts. A hand instrument can carry a hinge pin, a ratchet, a locking screw and a set of tips, and a powered driver carries shafts, collets and couplings. Most of these parts are small, round and made in volume from stainless steel or titanium, which makes them natural work for a Swiss-type lathe.
This guide covers the components that come off Swiss machines, the materials and finishes reusable instruments need, how sterilization shapes the design and what a buyer should specify.
Typical components
| Component | Function | Typical size | Notes |
|---|---|---|---|
| Hinge or pivot pin | Joins two instrument halves | 1 to 4 mm | Tight fit, riveted or threaded |
| Pivot screw | Adjustable joint | 1.5 to 4 mm | Fine thread, slotted or hex head |
| Set screw and locking pin | Holds a part in position | 1 to 3 mm | Hex socket, cup or flat point |
| Shaft or rod | Transmits motion or force | 2 to 10 mm | Long, slender, often with flats |
| Driver tip | Engages a screw head | 2 to 6 mm | Hex, star or square form |
| Collet and coupling | Holds a tool in a powered driver | 3 to 12 mm | Concentricity critical |
| Cannulated shaft | Passes a guide wire | 2 to 8 mm | Deep hole through the center |
| Knob and handle insert | Grip and adjustment | 5 to 20 mm | Knurled or flatted |
| Ratchet pawl and tooth | Locks forceps closed | 2 to 6 mm | Hardened, small teeth |
These are typical sizes. Real instruments vary widely, and the Swiss-type lathe’s niche is the slender, small-diameter end of the list. Related guides: medical machining, polygon turning for hex features and knurling.
Where the parts go: three instrument families
The same lathe makes parts for quite different instruments, and the families have different priorities.
Hand instruments. Forceps, clamps, retractors and needle holders are jointed tools. The small parts are hinge pins, box lock screws, ratchet components and tips. The priorities are smooth joint action, a secure lock and a surface that cleans well. Materials are mostly hardenable stainless, with a satin finish. Volumes are modest and the parts are often made in families.
Powered instruments. Drivers, drills and saws carry rotating shafts, collets, couplings and keyed ends. The priorities are concentricity, balance and wear resistance, since a wobbling tool drifts and heats the bone. Shafts are often slender and hardened, with flats and grooves cut by live tools. Cannulated versions follow a guide wire and need a deep, straight bore, as the deep hole drilling guide explains.
Minimally invasive instruments. Laparoscopic and endoscopic tools are long, narrow shafts with a working tip at one end and a handle at the other. The Swiss-type lathe makes the slender shafts, the actuating rods, the small pins and the tubes’ end fittings. The priorities are straightness, small diameters and a smooth inside surface where rods slide. These parts are among the hardest in the category, since they combine length, slenderness and tight fits.
Knowing which family your part belongs to helps the shop choose tooling and inspection. A pin for a hand instrument is a simple job, and a shaft for a powered driver is a more demanding one.
Materials
Instrument materials are chosen for strength, corrosion resistance and the ability to survive sterilization.
| Material | Typical use | Notes |
|---|---|---|
| 17-4 PH stainless | Shafts, pins, tips | Hardened by aging, good corrosion resistance |
| 420 and 440 stainless | Cutting edges, ratchets | Hardenable, lower corrosion resistance |
| 416 stainless | Screws, pins | Free machining, moderate hardness |
| 304 and 316 stainless | Handles, knobs, housings | Tough, corrosion resistant, not hardenable |
| Titanium alloys | Lightweight instruments | Strong and light, harder to machine |
| Aluminum, anodized | Handles, trays | Light, not for repeated harsh cleaning in some cases |
| PEEK and similar polymers | Radiolucent instruments | Passes X-rays, moderate strength |
Standards such as ISO 7153-1 define the stainless grades for surgical instruments, and ASTM F899 covers wrought stainless steels for instruments in the United States. Your customer’s drawing or specification names the grade, and the shop buys certified bar to match.
The 416 and 420 article explains the hardenable grades in detail, and the titanium guide and the PEEK guide cover the others.
Sterilization shapes the design
Reusable instruments go through washing, disinfecting and steam sterilization again and again. A common steam sterilization cycle holds the load at about 121 to 134 degrees Celsius for a few minutes, with the exact cycle set by the hospital. Over hundreds of cycles, the material and the design must hold up.
Consequences for the part:
Corrosion resistance. Repeated exposure to moisture, detergents and heat attacks the surface. Passivation after machining restores the protective film, and a correct heat treatment keeps hardened grades corrosion resistant.
No crevices. A blind hole, a tight gap or a sharp internal corner traps residue that cleaning cannot reach. Designers avoid them, and a machinist who sees one on a drawing should ask why. Open, accessible geometry is cleaner.
No sharp edges. Sharp edges tear gloves and trap debris. A defined edge break on every external edge is typical.
Thermal behavior. Parts of different materials expand differently. A pin in a bore that fits at room temperature can bind at sterilization temperature. Dissimilar metals in contact can also corrode galvanically, which designers avoid.
Repeated stress. A spring or ratchet flexes over thousands of cycles. Material condition and finish decide fatigue life.
Heat treatment and distortion on small hardened parts
Hardened instrument parts, such as ratchets, driver tips and cutting edges, are turned soft, heat treated and then finished. Heat treatment moves metal. A slender shaft can bow, a thin ratchet tooth can distort and a hole can go slightly out of round. The effects are small but they matter when a fit is a few microns.
Shops handle distortion in layers. They leave stock on critical surfaces so grinding or hard turning can bring them to size. They straighten shafts after hardening. They choose steels that distort less, such as precipitation hardening grades that age at a low temperature without a quench. And they inspect after heat treatment, not before.
The drawing helps by stating which dimensions apply after hardening and what hardness is required, with a test location that makes sense for a small part. A hardness test on a 2 mm pin leaves a mark, so the location should be on a face that does not matter. The centerless grinding guide shows how hardened shafts are brought to size.
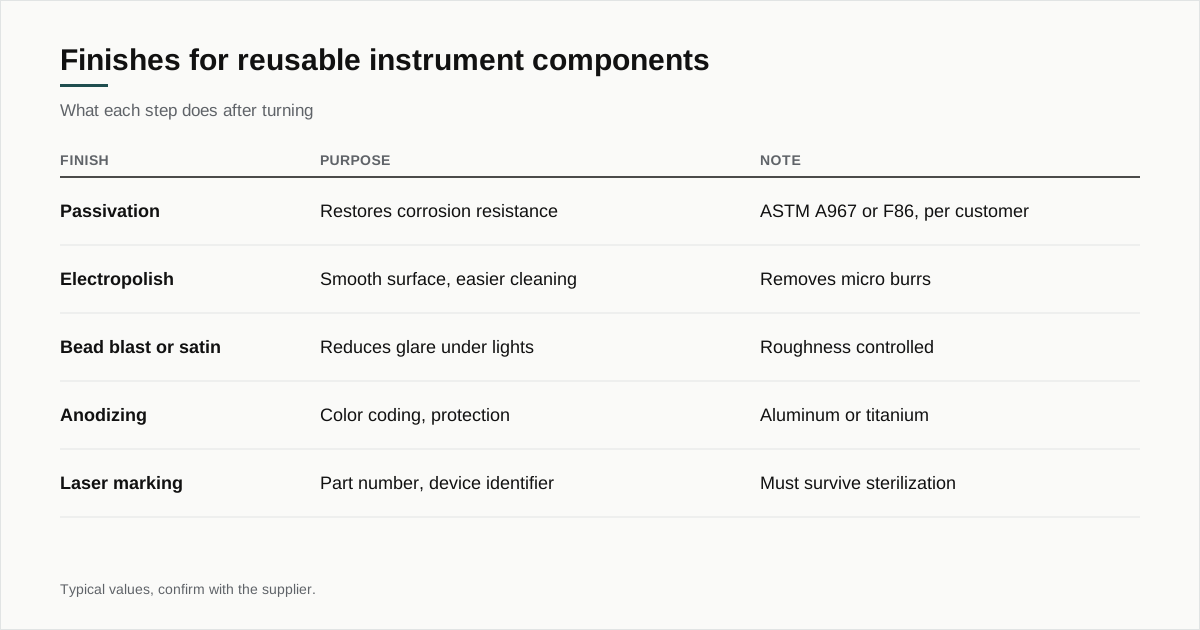
Finishes
| Finish | Purpose | Notes |
|---|---|---|
| Passivation | Restores corrosion resistance | ASTM A967 or ASTM F86, per customer |
| Electropolish | Smooth, clean surface | Removes micro burrs, improves cleanability |
| Bead blast or satin | Reduces glare | Roughness controlled, still cleanable |
| Mirror polish | Appearance, easy cleaning | Reflects light, used on some parts |
| Black oxide or coating | Anti-glare, marking | Must withstand cleaning cycles |
| Anodizing, aluminum or titanium | Color coding, protection | Color identifies size or function |
| Laser marking | Part numbers, unique device identifiers | Must survive sterilization |
Finishing usually happens outside the lathe. The secondary operations guide explains the sequence and its effect on lead time, and the surface finish guide covers how roughness is specified.
Common problems on instrument parts
Galling in the joint. Two stainless parts sliding against each other can seize, particularly when they are the same alloy and the same hardness. Designers vary the materials or the hardness of mating parts, or add a coating. If a pin and a bore are both 316, expect trouble, and raise it early.
Staining after sterilization. Rust spots on a new instrument after its first cycles usually come from free iron on the surface or from contamination in machining. Passivation and thorough cleaning prevent most of it.
Handling marks. Satin and polished surfaces show scratches. Parts that fall into a bin together arrive marked. Packaging in trays or with separators avoids it, and the packaging guide explains the options and their cost.
Burrs that appear later. A burr that was folded over during machining can spring out during use or cleaning. Deburring that removes burrs rather than moving them, and inspection under magnification, catch them.
Mixed parts. Instrument families contain many parts that look alike. Lot control at each changeover, with clear labeling, keeps the wrong pin out of the wrong box.
Tolerances and fits
Instrument parts have moderate tolerances in most places and tight ones at fits. A hinge pin in its bore is a typical tight fit, with a clearance of a few microns to give smooth motion without play. A driver tip has to fit its screw head with little slop, or it strips. A collet has to run concentric with its shaft, or the tool wobbles.
State which features are critical and let the rest take a general tolerance. A drawing where every dimension is tight pays for tolerances nobody needs. The tolerance guide explains how to choose them.
Documentation and quality systems
Medical customers expect traceable materials and controlled processes. Common requests:
- Material certificates tied to the bar lot
- First article inspection reports
- Lot traceability from bar to shipment
- Process validation for special processes such as heat treatment and passivation
- Cleaning and packaging requirements to match the customer’s sterilization route
What a shop can show depends on its systems. Some customers require a certified medical quality system, and the certifications guide explains what such certifications mean and what they do not. State your requirements at the start, and ask each shop what it can document. Do not assume.
What drives cost
| Driver | Effect |
|---|---|
| Material and certification | Certified bar costs more than commercial bar |
| Hardened grades | Heat treatment, finishing, distortion allowance |
| Tight fits | Slower cuts, more inspection, grinding |
| Finishing steps | Passivation, electropolish, marking |
| Documentation | Time per lot, particularly for first articles |
| Volume | Instruments run lower volumes than disposables |
Instrument volumes are often modest, in the thousands or tens of thousands a year, and the minimum order quantity guide explains how lot size interacts with setup. A shop that runs several instrument parts for you can share setup and inspection effort, so ask for a family quote.
A worked example
Take a pivot screw for a pair of forceps: 2.5 mm head, 2 mm shank, a thread of about 8 mm and a hex socket in the head. The material is 17-4 PH stainless. The drawing asks for a passivated, satin finish and a fit of a few microns on the shank.
The shop turns the head, shank and thread, forms the hex recess by rotary broaching or milling and parts off the screw. The screws go to age hardening, then centerless grinding of the shank to the fit, then passivation and a satin finish. The shop inspects shank diameter, thread, head height and socket size, and confirms hardness on a sample.
Each step has a reason, and the drawing is better if it names the finish and the fit and leaves the sequence to the shop.
What to put on the drawing
- Material, standard and condition
- Heat treatment and hardness, with test location
- Critical fits and concentricity
- Edge breaks and burr limits
- Surface finish and roughness, including the glare requirement
- Passivation or other finishing, with the standard
- Marking requirements
- Cleaning and packaging
- Documentation and traceability
- Yearly volume
Getting instrument components quoted
Send the drawing and STEP file through the RFQ form. State the material, the finish, the documentation you need and the yearly volume, and list the parts that belong together. We match the parts with up to three shops that run Swiss-type lathes and reply within 24 business hours.
If your assembly has many small parts, ask whether one shop can quote the whole family. A single supplier for the set reduces coordination and makes fits between parts easier to hold.
Frequently asked questions
How is an instrument component different from an implant?
An instrument is reused or used briefly and does not stay in the body, while an implant does. That changes the material rules, the documentation and the finish. Reusable instruments must survive many cleaning and sterilization cycles, so corrosion resistance and crevice-free design matter more than they do on a single use part.
Which stainless steels are used in reusable instruments?
Martensitic grades such as 420 and 17-4 PH are common where hardness is needed, and austenitic 304 and 316 where it is not. Standards such as ISO 7153-1 and ASTM F899 define grades for instruments. Your customer's specification decides which grade the shop buys.
Why do instrument drawings call for matte finishes?
Surgeons work under bright lights, and a polished surface reflects glare. A satin or bead blasted surface reduces it. Matte finishes also hide minor scratches, but they must still be cleanable, so the roughness is controlled.
Need a quote for this part?
Send the drawing. We match you with up to 3 Swiss shops and reply within 24 business hours.
Get matched with a Swiss shop